Flowable 6 快速体验
“Ok, so there’s a download of Flowable Open Source available, meaning I don’t need to checkout and build from source, but you know what, I’ve still only got a few minutes to see if it’s worth investing more time.”
“好的,有编译好的Flowable安装包可以直接下载,这意味着我不需要检出源代码自己编译。但是你知道的,我只有几分钟时间来看看这软件否值得我投入更多时间。”
I know your time is valuable, so here’s a really quick run through you can follow with the download, and hopefully it’ll persuade you it is worth investing more into the very cool technology underneath. I’m going to make it techie light, so any interested user can also get a feeling for it too.
我知道你的时间很宝贵,所以这里有一个快速运行包可以下载,希望它能说服你投入更多时间在这项非常酷的技术上。我将把这项技术讲解的通俗易懂,所以任何感兴趣的用户都可以来尝试一下。
Already downloaded the latest Version 6 zip file? Ok, when it’s unzipped, the only thing we’re interested with today is the ‘wars’ folder. If you already know what to do with these, then don’t let me stop you, and jump to the next paragraph. If not, I’d recommend using the latest stable Tomcat for your operating system and all you need to download is the zip version of the Tomcat Core. Unzip that somewhere on your machine and browse to the unzipped folder. You should find a ‘webapps’ folder – and this is where you need to copy the flowable-ui.war file from the Flowable ‘wars’ folder. Once the .war files is in webapps, navigate to the ‘bin’ folder in Tomcat and start startup.bat if you’re on Windows, or startup.sh on Mac or Linux. If startup.sh doesn’t start, you may need to make it executable. Google is your friend.
已经下载好最新的 Flowable 6 压缩包了吗?好的,解压它,我们现在只关心 “war” 文件夹。如果知道接下来怎么做,那么请继续,并且跳过这一段;如果不知道,建议您使用适合你操作系统的最新稳定的Tomcat解压版,您可以到Tomcat官网下载。将Tomcat解压后,你会看到一个“webapps”文件夹,将“flowable-ui.war”文件拷贝到这个文件夹,然后进入Tomcat的“bin”文件夹,启动“startup.bat”(Windows操作系统),或者启动“startup.sh”(Mac或者Linux系统)。如果“startup.sh”没有启动,你需要把它设置成可执行文件。可以通过Google搜索相关内容。
入门(Getting started)
Hopefully, you have that lovely Flowable webapp running in Tomcat now, so we can start up the user interface. We’ll begin with the Task app, so fire up your fav browser, navigate to http://localhost:8080/flowable-ui and you should see the login screen below:
你现在应该已经在tomcat中运行了Flowable应用,所以现在我们能够访问界面。我们将从“Task app”开始,请打开你最喜欢的浏览器,在地址栏上输入http://localhost:8080/flowable-ui,这时应该看到如下的登录界面:

Login with the user admin and password test and you’ll be taken to your homepage. As an admin your landing page will show all the Flowable apps, but these don’t have to be visible to all users. There are four apps, as can be seen below:
使用用户名(admin)密码(test)登录,您将进入首页。作为管理员,您将看到所有的Flowable apps,但是这些并不是多所有用户都可见。有四个app,如下所示:
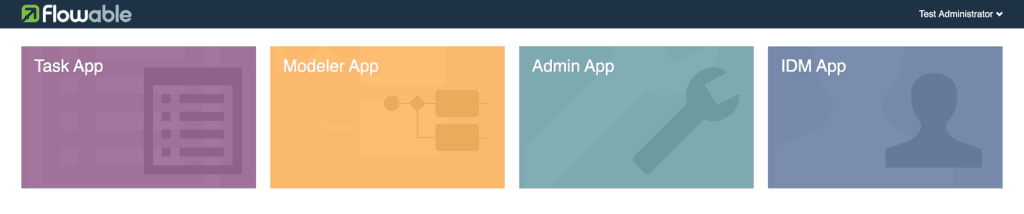
Click into the Task App to see a list of tasks assigned to you (Tasks page), processes (Processes page) or cases (Cases page) you’ve started. Not surprisingly, all pages are currently empty, so let’s add an ad hoc task by clicking the Create Task button.
点击进入Task App,查看所有分派给你的任务(Task page)、流程(Processes page)或者你启动的实例(Cases pages)。毫不奇怪,所有的页面现在都是空的。让我们点击创建任务按钮,添加一个临时任务。
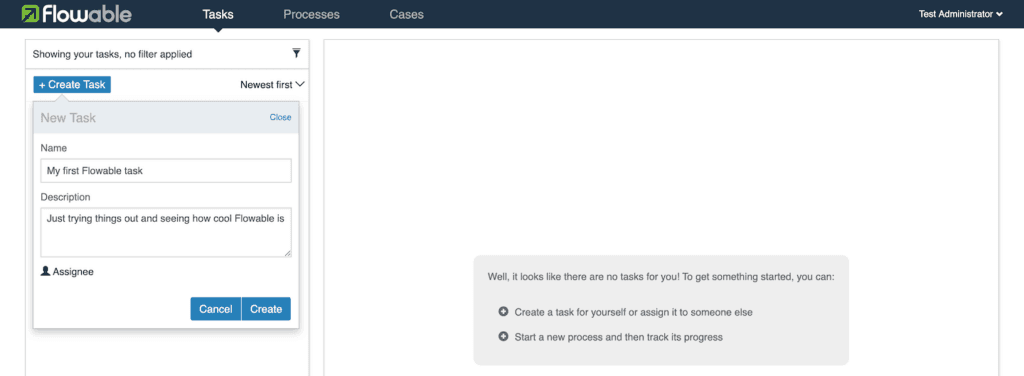
Fill in some details and create the task. The task will be assigned to you by default, so you’ll now see the new task in your Tasks list. The currently selected task’s details are shown as well, but again, there’s very little to see here at the moment.
填写一些内容,并且创建任务。这个任务将默认分配给你自己,所以你现在可以在任务列表里看到新任务。当前选中的任务详情也显示出来了,但同样的,现在几乎没有什么可看的。
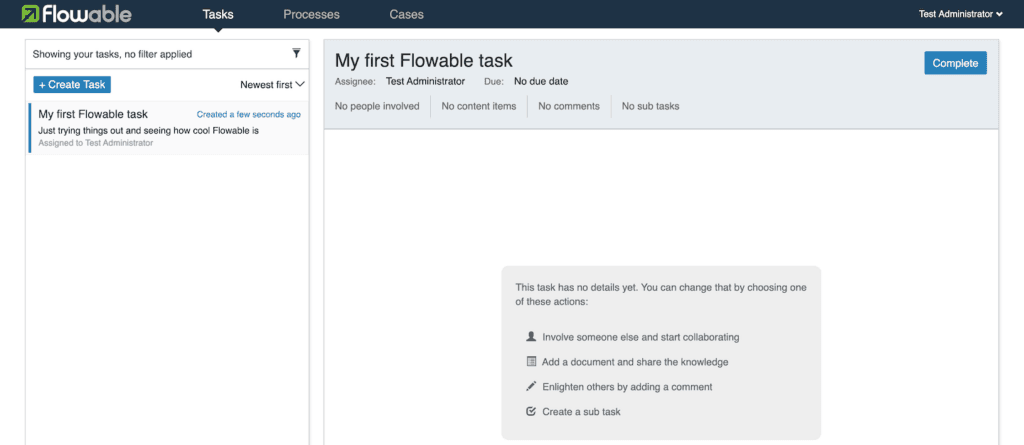
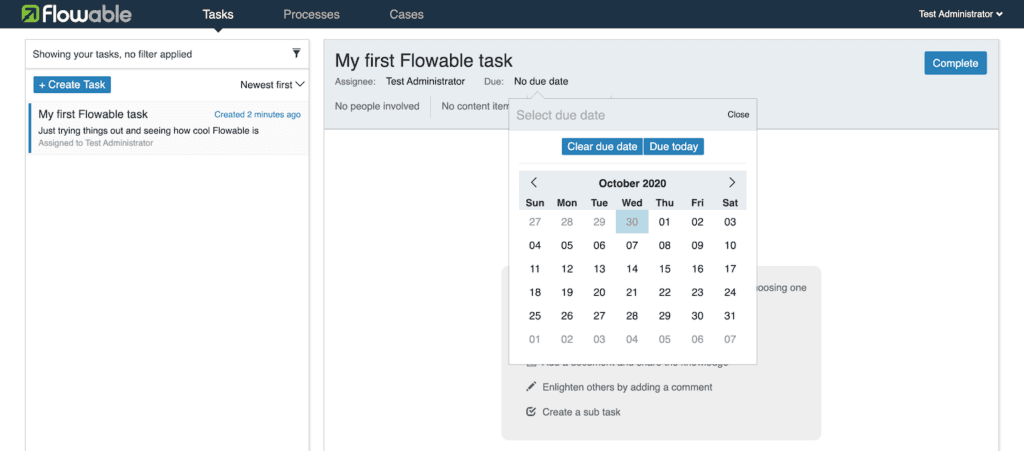
If you’re bored, you could just click the Complete button and feel a certain pride in finishing another job. It might be more interesting if you were to do some additional things to the task. If there were other users in the system, you could click on the Assignee to pass the task onto them, but there’s only the one user at the moment. You can set a due date – just click on No due date and select a date from the calendar.
如果你觉得无聊,你可以点击完成按钮,为完成另一份工作感到自豪。如果要对任务做一些额外的事情,你可能会觉得更有趣。如果系统中有其他用户,你可以点击“处理人(Assignee)”,将任务传递给他们,但是现在只有一个用户。你可以设置到期时间 —— 点击“No due date”并且从日历中选择一个日期。
添加和管理用户(Add and manage users)
It’s the time for us to jump to another part of the Flowable interface to create new users, groups and privileges. Click on the Flowable logo to navigate back to the landing page and then select the IDM App. There are 3 pages in the IDM (IDentity Management) app and you land on the User page first, so let’s create some users.
是时候进入 Flowable 界面的另一部分,去创建用户、组和权限。点击Flowable图标(logo),返回到首页并选择“IDM App”.在IDM(IDentity Managment) app有三个页面,您首先进入User page页面,所以我们先创建一些用户。
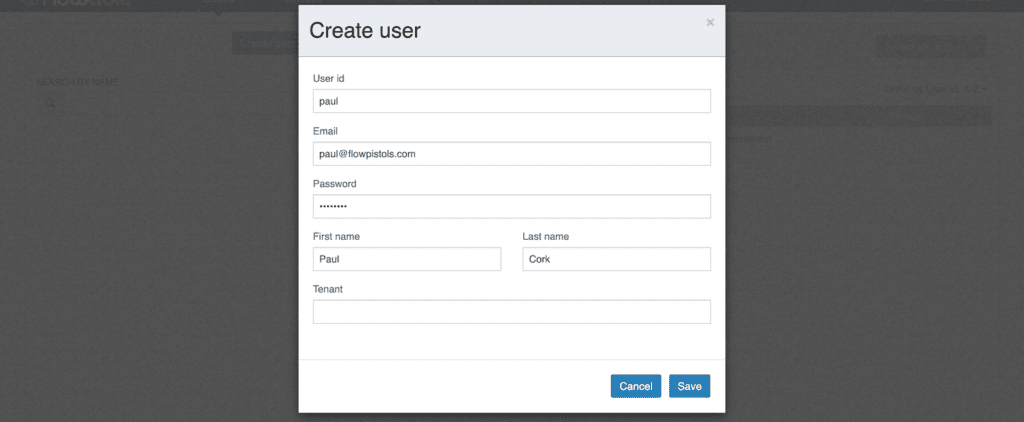
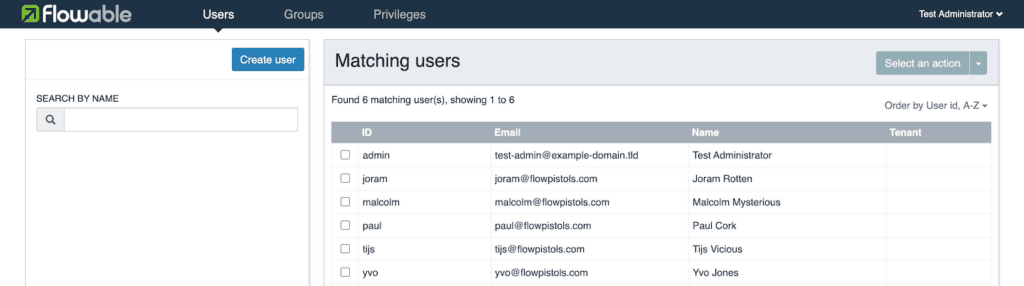
Just keep adding all of the band members as users. Remember to add Malcolm as well.
将所有乐队成员添加为用户。记得也要添加Malcolm。
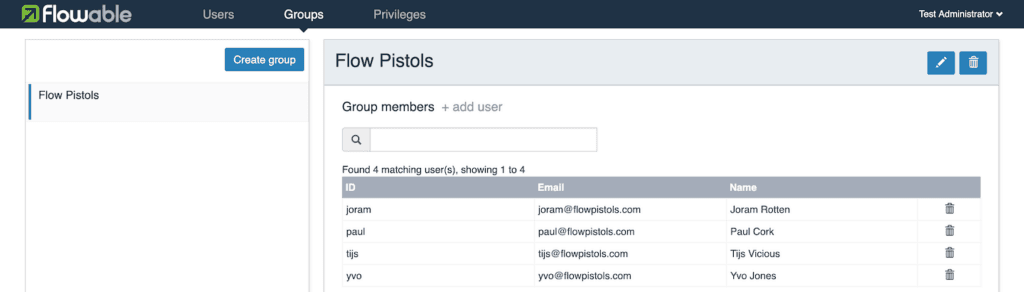
It will also be useful to manage the band as a group, so switch to the Groups page and create a new group.
将乐队作为一个组管理也很有用,因此切换到“组页面”(Groups page)并且创建一个新组。

With a new group, there are no members showing in the list. If there was, the search box would allow you to filter the list to check membership. To add a user to the group, click + add user, and a popup search provides a way for you to search for a user to add. To find Joram to add, enter ‘j’ or any group of letters, like ‘ram’ or ‘rot’. Add the four band members: Joram, Tijs, Yvo and Paul.
这个新组没有任何成员,如果有的话,搜索框允许你过滤成员列表,以检查成员关系。要添加用户到这个组,点击“+ add user”,会弹出一个搜索界面,可以找到你需要的用户并添加到组里。要搜索并添加“Joram Rotten”,输入“j”或其它单词里的字母,如“ram”或“rot”。添加四个乐队成员:Joram,Tijs,Yvo和Paul。
Next we need to give the right access privileges to the different users. Switch to the Privileges page and add Malcolm as a user in all the privilege groups, so he can have full control over new users and administering the system (well, he is a control freak).
下一步,我们需要给不同用户赋予正确的访问权限。切换到“权限页面”(Privileges page),将Malcolm加入到所有权限组中,这样他就可以控制所有用户并管理系统(嗯,他是个控制狂)。
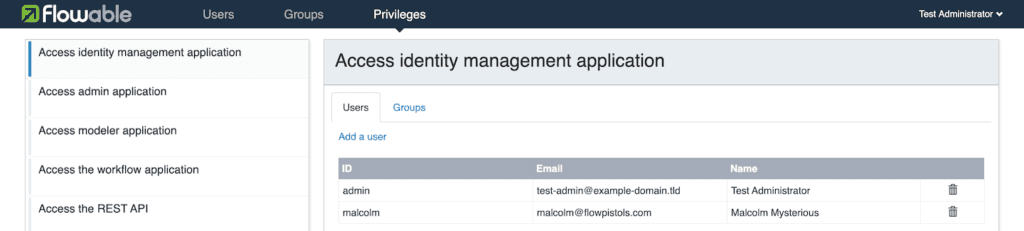
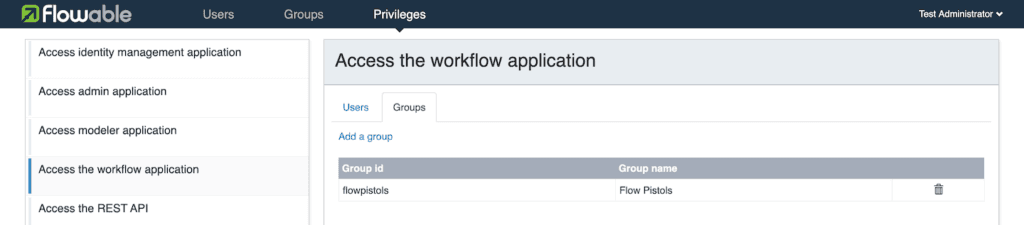
For the rest of the band, he only wants them to have access to the Task interface, so add the Flow Pistols group to the workflow application privilege.
乐队里其他成员只想访问任务界面,因此将“Flow Pistols”组加入到工作流应用权限中(workflow application)
设计流程(Design the process)
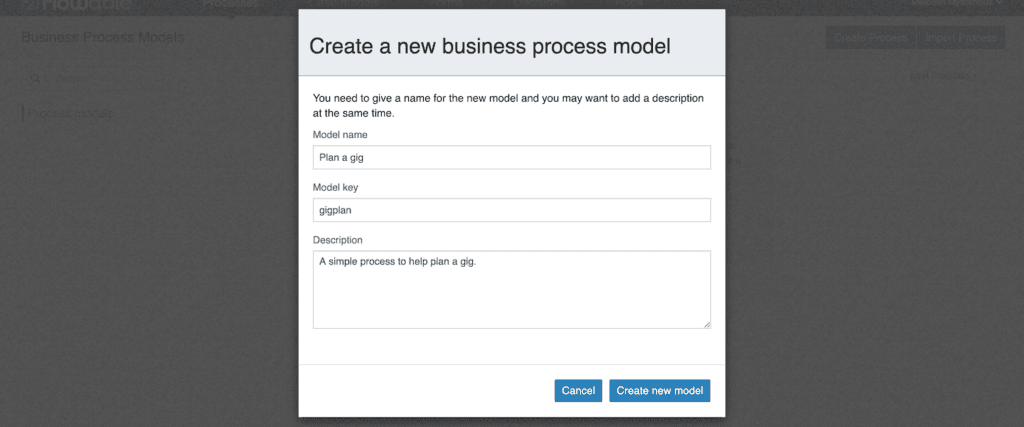
Now it’s time to define the process. We’ll keep it simple as a first attempt. To design a process you need to have the modeler privilege, which gives us a chance to test the privileges by signing off as admin and signing in as malcolm – sign out from the menu on the user name in the top right corner. After signing in as Malcolm using the password you gave, select the Modeler App and you’ll be taken to the Process page. Here you need to click Create process to get started. Fill in some details, including a unique key as an identifier for the model.
现在是时候定义流程了。第一次尝试,我们将保持简单。设计流程你需要模型的访问权限,这将给我们一次测试权限的机会。退出admin用户,并且以malcolm用户登录。从右上角用户名的菜单中注销。使用你设置的密码,以malcolm用户名登录后,选择模型app(Modeler App),你将进入流程页面(Process page)。点击创建流程(Create process)按钮,填写表单,包括一个唯一的key作为模型标识。
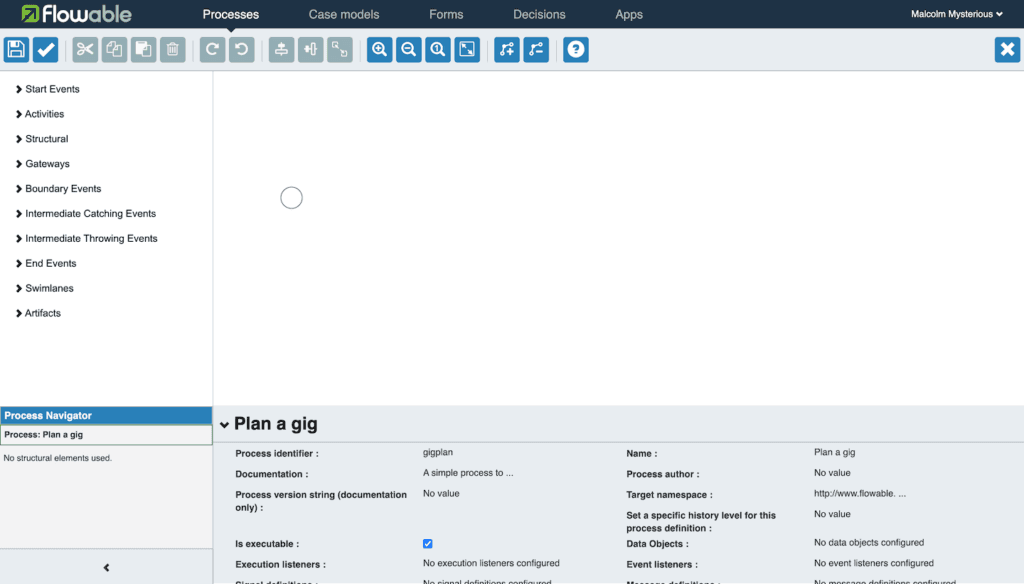
You’ll be taken directly into the process design interface, with a palette of BPMN 2.0 elements on the left-hand side. There’s a panel in the bottom part of the page with all the properties for the model. This panel gets updated with the properties of whatever has been selected in the process canvas. Which takes us to the design canvas – with a new process, a Start event element is already there, represented as a small circle.
你将会直接带入到流程设计界面,左边有有一个BPMN2.0元素面板。页面底部有一个模型属性面板,画布中选择中的元素,这个面板的属性会随之更新。在这个新的设计画布中,存在一个开始事件元素,显示为一个小圆圈。
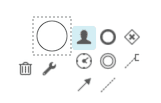
You can design the process by dragging and dropping elements from the palette on the left, or you can use the “quick menu” of a selected element on the canvas. I find the quick menu the quickest (why would that be?), so that’s the approach I’m going to use. Click on the start event on the canvas and its quick menu will become visible. We’re going to add a User Task next, so click the icon representing a user.
你可以通过拖拽左侧面板中的元素来设计流程,也可以使用选择元素后显示的快捷菜单(quick menu)。我发现使用快捷菜单是最快的方式(为什么会这样?),因此这是我检查使用的方式。点击画布中的开始事件(start event),会显示快捷菜单。我们打算添加一个用户任务,因此点击用户图标。
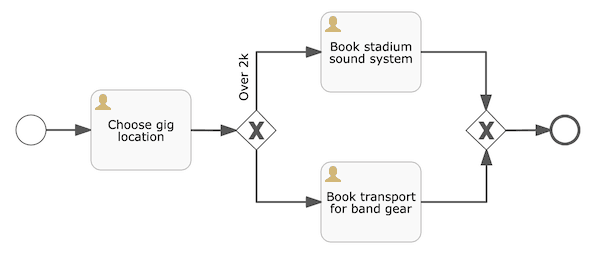
This should add a box linked by an arrow to the start event. Double-click on the box to give the task the name Choose gig location and click outside the box to save the change. Click on the box again to display its quick menu and select the Gateway icon (a diamond containing x).
这将添加一个框,通过箭头连接到开始事件。双击这个框,给这个任务加上“Choose gig location”名字,然后点击框的外部,以保存这个修改。再次点击这个框,在显示的快捷菜单上选择网关图标“Gateway icon”(包含 x 的菱形)。

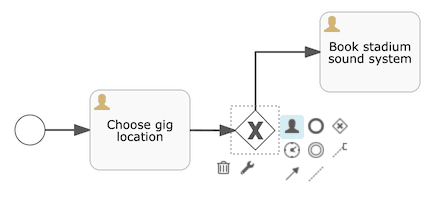
This adds an exclusive gateway after the task. If you wanted it to be an inclusive or parallel gateway you could click the spanner icon on the quick menu to change the type of gateway, but leave it for now. After the gateway we’re going to add another task for a person, so click the User Task icon.
这在任务之后添加了一个排他网关。如果你希望它是一个包容性或并行网关,你可以点击快捷菜单上的扳手图标(spanner icon)改变网关类型,但暂时不要这么做。在网关之后,我们希望添加另一个任务,因此点击用户任务图标(User Task icon)。

Name the new task Book stadium sound system and drag the bend in the connecting arrow to above the gateway by moving the mouse over the connector and grabbing the red dot that appears on the bend.
给新任务命名为“Book stadium sound system”,并将箭头上的弯道拖拽到网关的上方,方法是将鼠标移到连接器上并抓住弯道上出现的红点。
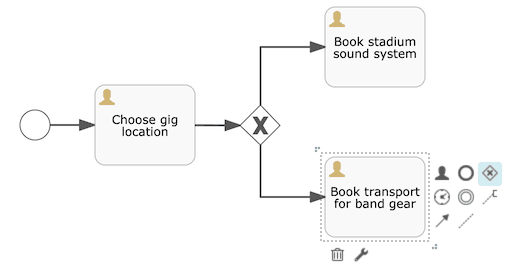
Click on the gateway element and click the User Task icon again. This adds another task connected to the gateway. Name it Book transport for bandgear and lay it out to make the process diagram nice and clear.
选中网关元素,再次点击用户任务图标。这将添加另一个连接到网关的任务。将它命名为“Book transport for bandgear”,并调整布局,使之清晰明了。
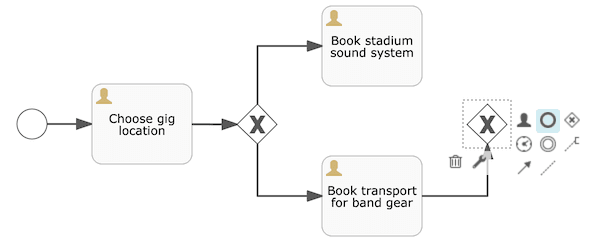
Click on the last task and select the Gateway icon. This will add another gateway, and before doing anything else, just quickly click the Stop event icon on its quick menu (circle with a thick border).
选中最后任务,点击网关图标。这将添加另外一个网关,在做其它事情之间,先点击它快捷菜单上的结束事件图标“Stop event icon”(带有粗边框的圆圈)。
Now we need to connect the “stadium” user task to this gateway, which we can do using the Connector icon on its quick menu. Click on it and drag the mouse over to the last gateway and release to complete the connection.
现在我们需要连接“stadium”用户任务到网关。我们可以使用快捷菜单上的连接图标(Connector icon)。点击它并拖动鼠标到最后一个网关上,释放后即可完成连接。
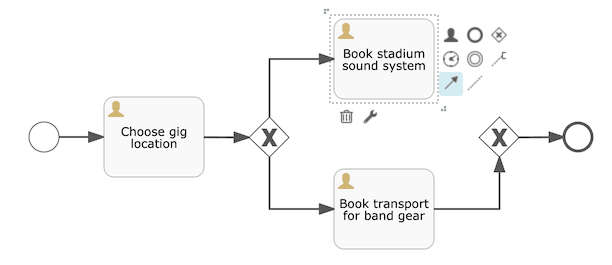
The connector is straight, so here’s a chance to see how we can add (or remove) bends to lay it out as we wish. The “bend” edit icons are in the toolbar.
最后一个连接是直的,刚好可以尝试一下如何添加或删除拐角。拐角编辑图标在工具栏上。
Click the + bend icon to switch into bend edit mode.
点击+拐角图标,切换到拐角编辑模式

Click on the connector where we want to add the bend and a red dot will appear, which can then be dragged to create a more pleasing layout.
点击连接上的想要增加拐角的地方,会出现一个红点,拖动红点即可创建一个更赏心悦目的布局。

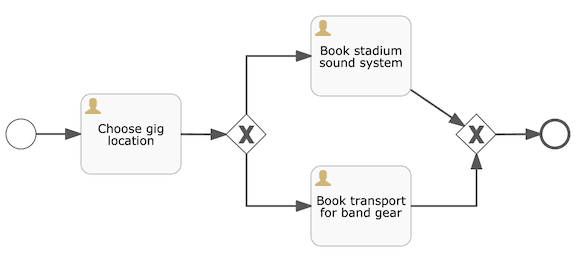
This gives us the overall process we want to use, so now let’s add some forms to the user tasks to collect data that we need as part of the process
这为我们提供了我们想要的完成流程,现在让我们为用户任务添加一些表单,用于搜集流程中需要的数据。
绘制数据收集表单(Draw some data collection forms)
There’s a couple of ways you can define forms. One is to go to the Forms page in the Modeler app and just create form models, then link them to the process. Alternatively, you can create them within the process model automatically linked (and they’ll also show on the Forms page). You can add forms to User Tasks and Start Events by selecting the element and clicking their Referenced form property. This pops up a large dialog with options to select and open an existing form, or create a new one. Let’s get going with the process for the Flow Pistols, by selecting the Start Event and clicking its Referenced form property, then click the New form button and complete the details to create a form, including a unique form key identifier.
有很多种方式定义表单。其中一种就是到模型app的表单页面(Forms page)创建表单模型,然后链接到流程里。或者,你可以在流程模型里创建表单(他们会自动显示在表单页面中)。你可以选中用户任务(User Task)和开始事件(Start Events),并点击其引用表单属性(Referenced from property),然后添加表单。这会弹出大对话框,可以选择并打开现有的表单,或者创建一个新表单。让我们开始Flow Pistols流程,选择开始事件(Start Event),点击其引用表单属性(Referenced from property),然后点击新表单按钮(New Form button),并完成详细信息以创建一个表单,包括唯一的表单标识。

This will now take you into the Form designer, with form components on the left-hand side that can be dragged onto the design canvas. The only data we want to collect when a process is started is in which part of the world the gig will take place. We can do this by using a dropdown field, so drag and drop the Dropdown element from the palette on the left to the design canvas.
这会带你进入表单设计器,左侧的表单组件可以拖拽到画布中。流程开始时,我们唯一收集的数据是,演出将在这个世界的哪个地方举办。我们可以使用下拉字段,从左边的面板中拖拽下拉元素到设计画布里。
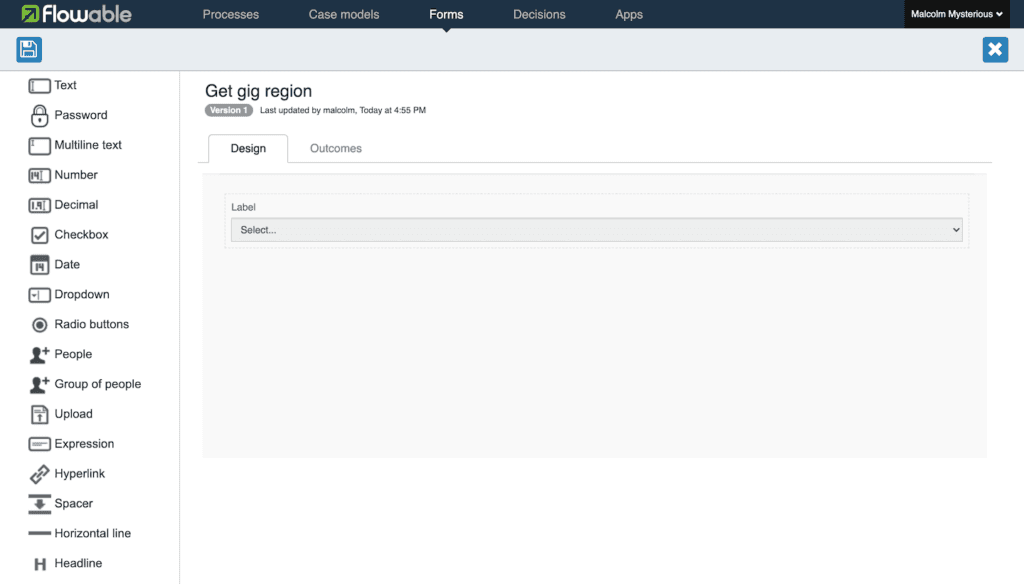
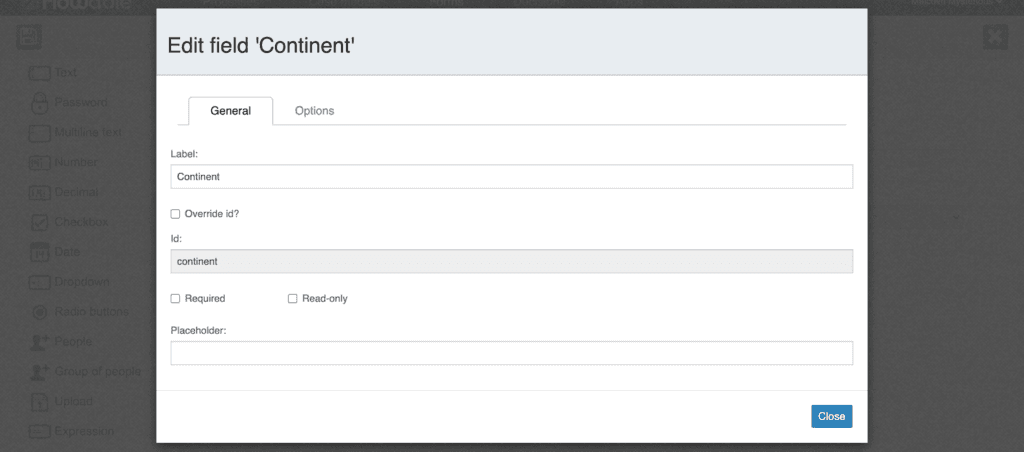
It will be given a default name of “Label”, which isn’t too informative, so to change it, hover your mouse over the dropdown field on the canvas and an edit button (pencil) will appear. Click on this to edit the settings for this field. Give the field the label Continent and you’ll also see it give an Id (identifier) of continent, which is the reference we’ll use to refer to this field later. It’s also possible to define your own identifier. You can also mark a field as Required, meaning the form won’t complete unless a value is given.
它将被赋予一个默认的名称“Label”,这个名称没有包含什么信息。将鼠标悬停至下拉字段上,会出现修改按钮(pencil)。点击这个它,就可以修改字段设置。将label改为“Continent”,你将会看到id也变成了“continent”,稍后可以使用这个名称引用这个字段。也可以定义自己的identifier。你还可以把这个字段标识为必填,这意味着表单必须填写这个字段,才能提交。
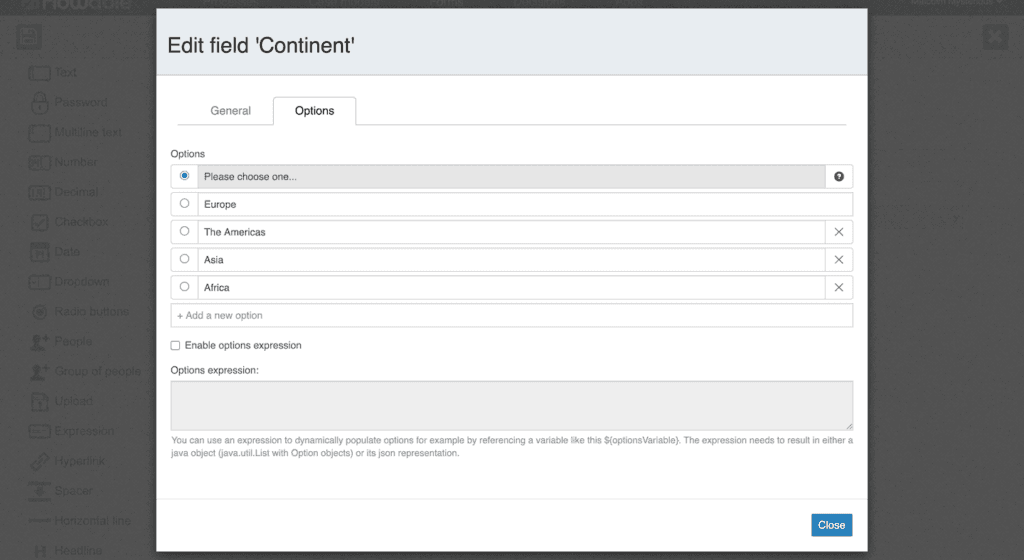
We want to define the values for the dropdown menu, so click on the Options tab and add Europe, The Americas, Asia and Africa.
我们想设置这个下拉字段的可选项,所以点击选项页签(Options tab),添加Europe、The Americas、Asia 和Africa。
Close the field edit dialog and then save the form. You’ll be taken back to the process designer.
关闭字段编辑对话框,然后保存表单。你将被带会流程设计器界面。
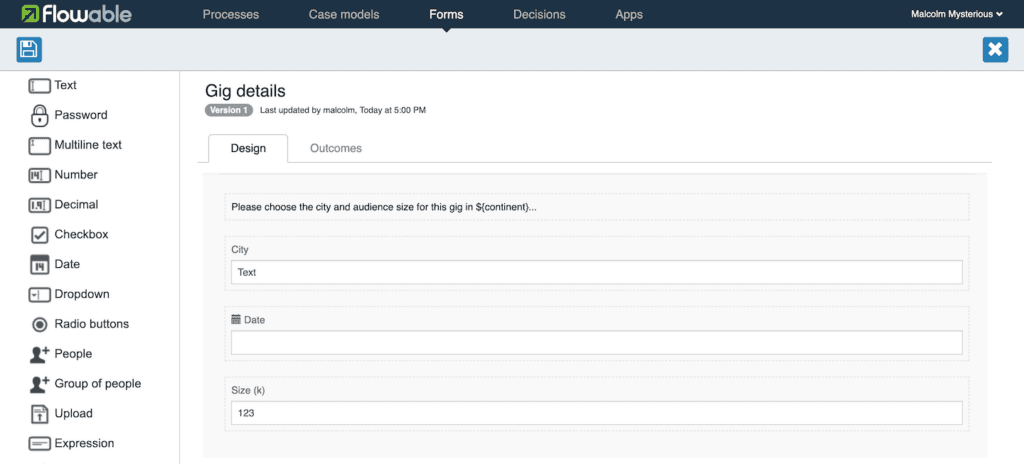
Next, select the Choose gig location user task and click its Referenced form property. Again, click New form and get taken to the form designer. This time, drag an Expression field onto the canvas, followed by a Text field, then a Date field and finally a Number field. We’re going to use the Expression field to give some relevant information to the person who will complete the form. Edit the Expression field and enter the text “Please choose the city and audience size for this gig in ${continent}…”. As you may have guessed, the value selected in the initial form for the Continent field will be substituted in the text.
下一步,选择“Choose gig location”用户任务并且点击其“Referenced form”属性。

Edit the Text field and give it the label City; likewise, label the Date field as Date and Number field as Size (k) (its identifier will be sizek). You should now have a form that looks something like the following.
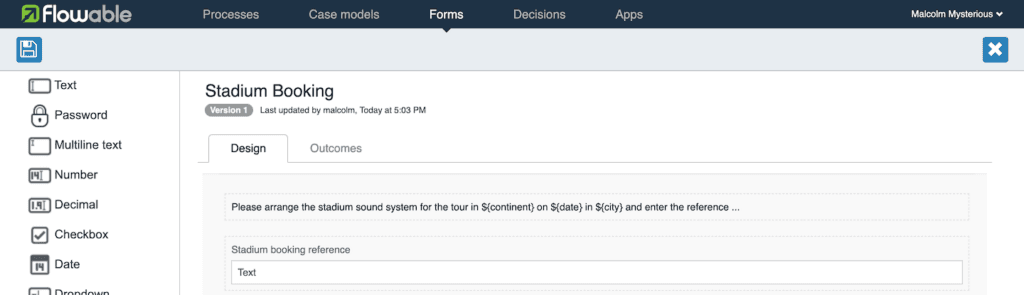
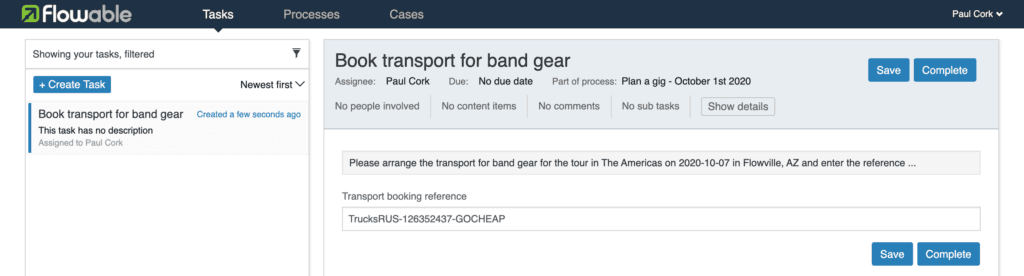
Finally, add new forms for the two booking user tasks. Add an Expression field and Text field for each, edit the Expression field and give it an expression like“Please arrange the stadium sound system for the tour in ${continent} on ${date} in ${city} and enter the reference …”, and give the Text field a label like “Stadium booking reference”. Do I need to say change the text and label as appropriate for the Booking transport for the band’s own gear task?
We now have tasks and forms to collect data as we go through the process, but who’s responsible for doing what? Responsibility isn’t a word that’s familiar to rock stars like the Flow Pistols, but efficient processes means saving costs, which means more cash in the pockets of our rockers to spend on their outrageous lifestyle. Let’s define who does what.
我们现在有任务和表单在流程中收集数据,但是谁负责做什么呢?责任对于Flow Pistols这样的摇滚明星来说并不熟悉,但是高效意味着节省成本,这意味着摇滚歌手的口袋里有更多的现金,可以花在他们那令人发指的生活上。让我们来谁该做什么。
给人分配任务(Assign tasks to people)
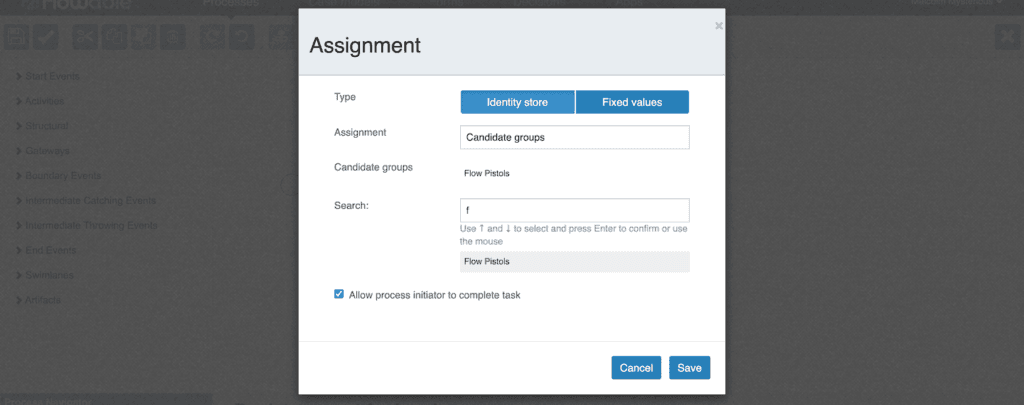
Responsibility for a task is defined by setting its assignment. You can do this by selecting a User Task and clicking its Assignments property. A dialog pops up that allows you to choose whether the assignee should be a single person (it can be a named user, or simply the person that started the process); a list of candidate users; or, one or more candidate groups. If a task is assigned to a list of candidates or groups, then someone from the list or group has to claim the task to work on it – it then becomes directly assigned to them for that specific task in that specific instance of the process.
Let’s add some assignments. Select the Choose gig location user task and click its Assignments property. In the dialog that pops up, select Assigned to process initiator leaving the Type as Identity store.

Whoever starts the process will now get the Choose gig location task assigned directly to themselves. However, for booking the stadium gear, Malcolm is the only person with the knowledge and appropriate responsibility to do it. Select the stadium booking task and click its Assignments property. This time, select Assigned to single user and type “M” into the search box that appears. This will show a list of all users in the identity store that contain “M”, which includes Malcolm in this case, so pick his name.

When it comes to booking transport for the band’s own gear, we’re happy to let anyone in the band organize that. Select the booking transport task and click its Assignments property. Select Candidate groups, type “F” in the search box and pick the Flow Pistols group. We’ll also let anyone complete this task if they started the process, so turn on that option. This means that Malcolm can do the task, even though he’s not a member of the Flow Pistols group.
Nearly done on the process. The final thing to describe is when to take which of the different paths that are possible.
Define flow conditions
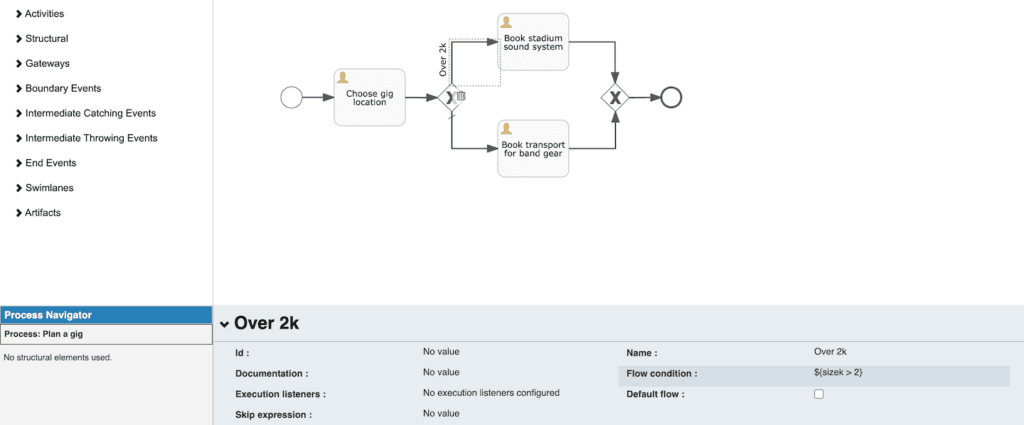
We have a choice of two paths through the process, so next we can define the conditions for taking one route or the other. Double-click on the connector going into the “stadium” task and give it the name Over 2k to help anyone looking at the diagram.
However, to actually define the condition we need to select the connector and click on the Flow condition property in the panel at the bottom. This opens a dialog where you can enter the expression that will be evaluated for a process to take that path. We want to follow the stadium path when there’s more than 2000 fans expected in the audience, so enter the expression ${sizek > 2}. We want the flow to go to organizing the band’s own gear in all other cases, so if we select that flow connector we can mark it as the Default flow in its properties.
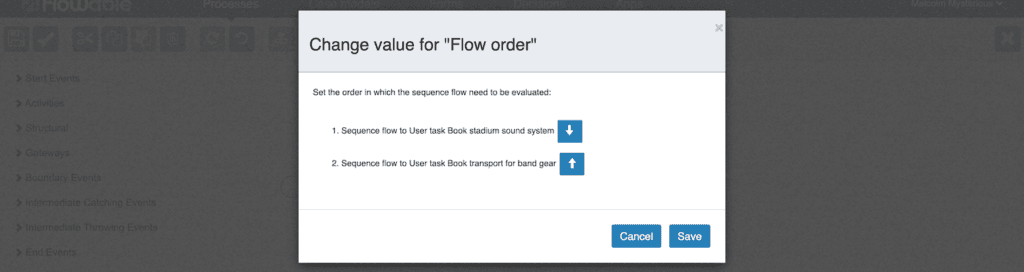
It’s also sensible to review the order in which the flow conditions are evaluated. The initial flow order is the order in which the conditions are defined. If that’s the order you need, you’re fine; if all your conditions are mutually exclusive, the order shouldn’t matter. Just to be sure, you can select the gateway element itself and click on the Flow order property, which allows you to reorder the conditions. It’s always worthwhile checking flow order if you have a connector without an explicit condition.
That’s it: process defined! We rock! However, before we can use it, we need to publish the process and all its components as a Process App. Switch to the Apps page in the Modeler to create our first app.
Create a Process App
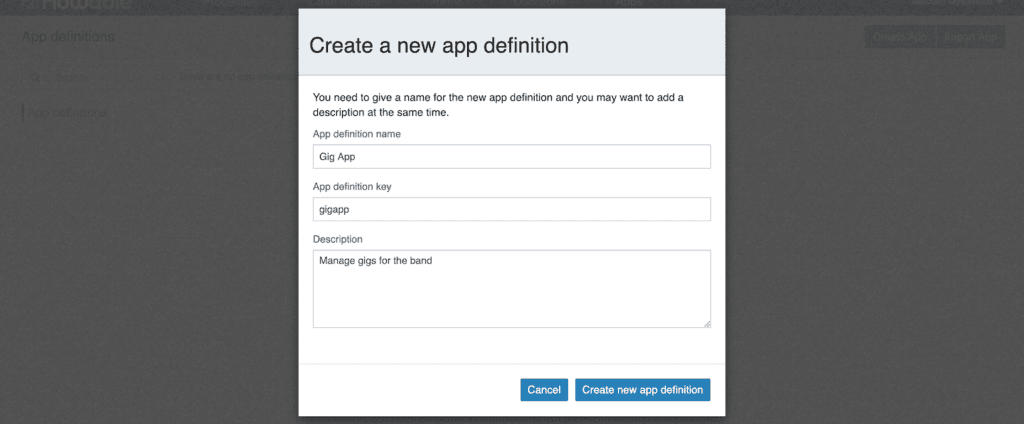
Once we have one or more processes designed, we can make them available for people to use. Typically, processes are grouped together either by who is going to use them or how they’re going to be used. You might put all your Human Resources processes in one process app, for example. We’re just going to have one process to begin with, so first click the Create app button on the Apps page, giving it a name, unique key and description.
一旦我们设计了一个或多个流程,我们就可以将它们提供给人们使用。通常,流程按谁将使用它们或将如何使用它们组合在一起。例如,您可以将所有人力资源流程放在一个流程应用程序中。我们只会从一个流程开始,因此首先单击“应用程序”页面上的“创建应用程序”按钮,为其指定名称、唯一键和描述。
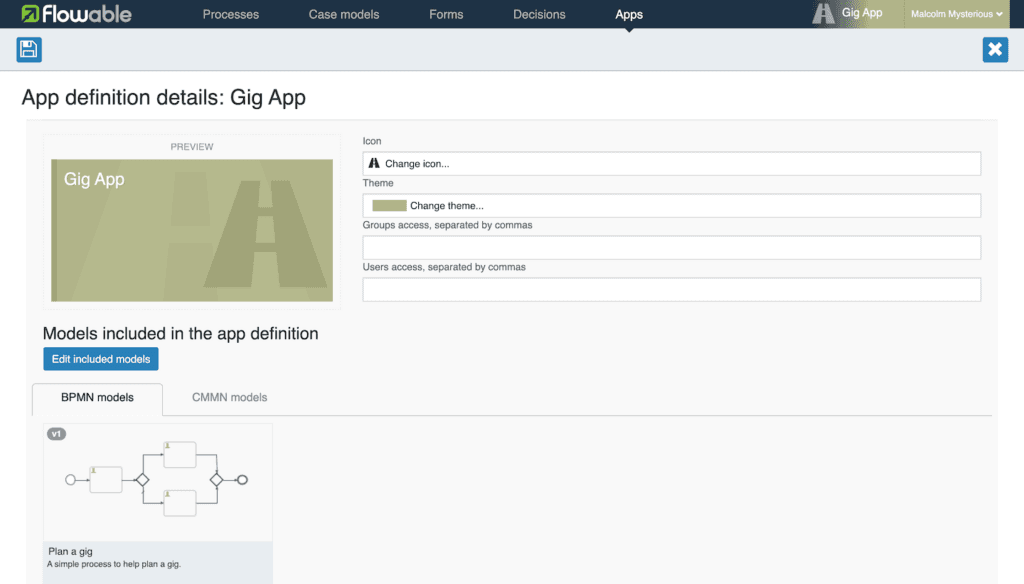
We’ll then get taken to the App editing view where we can pick an app icon and theme to help distinguish it from other apps. We also need to add our process to the list of models in the app, so click the Edit included models button. You’ll be shown a list of all the process models available and can select one or more to be included: select the process we just defined.
我们将进入App编辑试图,我们可以选app图标和主题,用于区别其它app。我们还需要将流程加入到app中,请点击Edit included models按钮。会列出所有可用的流程模型,你可以选择一个或多个:选择我们刚刚定义的那个流程。
Save the app model and we have our first app defined, but still not quite ready to be used. To make an app available for use, it meeds to be “published’, and everytime changes are made to any part of the process or forms, you will need to publish the app again to make those changes live. If you were sharp-eyed you will have noticed an option to publish on the Save App dialog. You can publish an app at anytime from its details view. Select our app from the Apps page and you’ll be taken to the details view. You’ll see a bunch of actions you can take from the toolbar, including Publish. Click that now.

We’ve finally got to the point where we can use our new process. We mega rock!
Starting your first process
To start processes and view tasks, we need to use the Task App again. Staying logged in as Malcolm, click the Flowable logo to go to the home page, where you’ll now see the new Gig App. Click the Gig App to work with all tasks and processes associated with it.

If you go into the generic Task App then you can see and work on all tasks and processes for all the apps available to you. Once in the Gig App task view, there’s a help bubble with an option to start a new process.
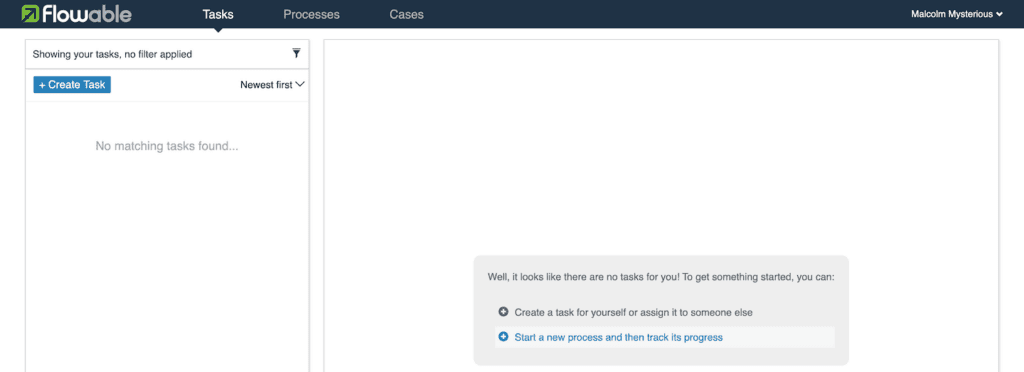
If you have tasks still active and no help bubble, you can also start a process by going to the Processes page. Whichever way you go, you’ll then get presented with a list of processes available within that process App. There’s only one for us to pick, and we’ll see its start form ready for us to pick a continent. Select a continent and click the Start process button.

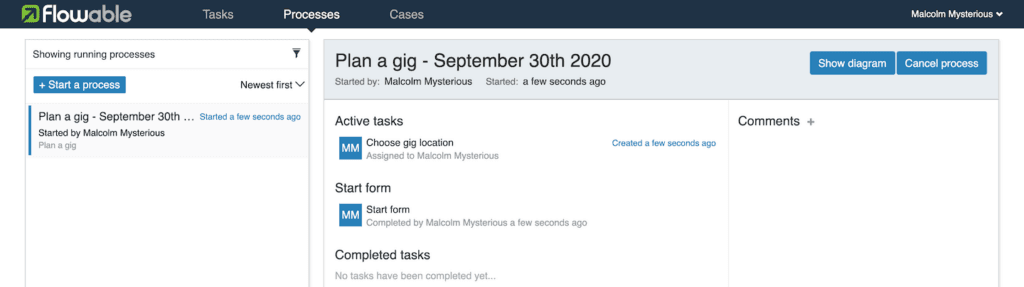
You’ll then be taken to the details view for the just created instance of the process. Here, you can see what tasks have been completed, what tasks are active and a graphical diagram of the process with its current state.
Switch to the Tasks page and you should see a Choose gig location task for you (as you were the process initiator). Enter an city and date, plus an audience size greater than 2k, for example 50, then click the Complete button.

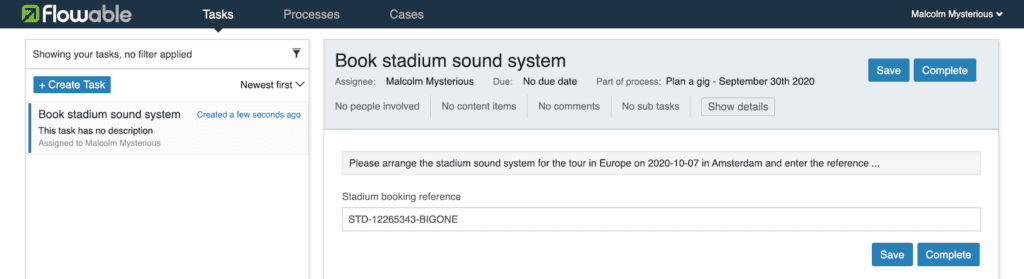
The view will switch to a Book stadium task, because the last task was completed and almost immediately a new task added to the top of your task list. Remember, only Malcolm will get assigned this task, so you need to be logged in as him to see it. Type some value for the booking reference and click the Complete button.
There we go, we’ve finished our first run of our process, and no animals or children were harmed, no public offended.
Taking a different path
Let’s create another instance of the process and take the alternative route using a different user. Sign out using the menu on the user’s name in the top right corner and then login using paul with the password you gave the user Paul Cork. You’ll only see the general Task App and the new app we just created, because Paul doesn’t have the permissions to use the Modeler, Admin or IDM apps.

Start a new instance of the process from the Gig App, but this time, give an audience size of 2 in the start form.
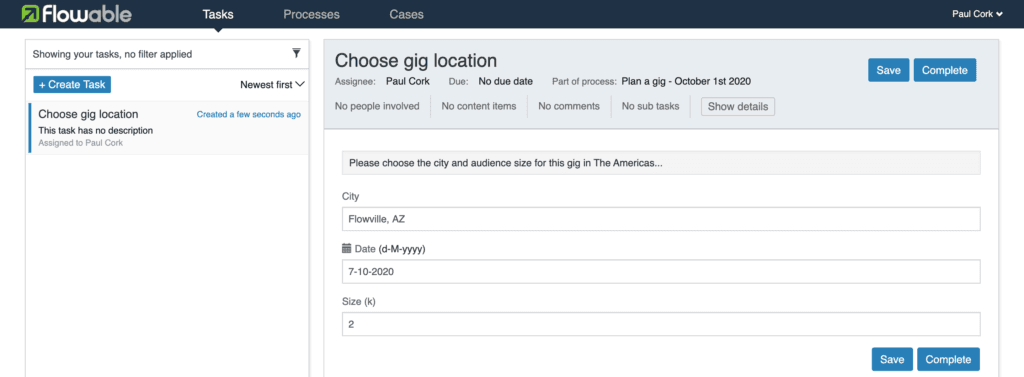
On the Tasks page, you may be surprised to see nothing. That’s because the task list shows tasks directly assigned to the user, but this can be changed by clicking the filter area at the top of the task list. Select the filter option Assignment and set it to Tasks where I am one of the candidates.
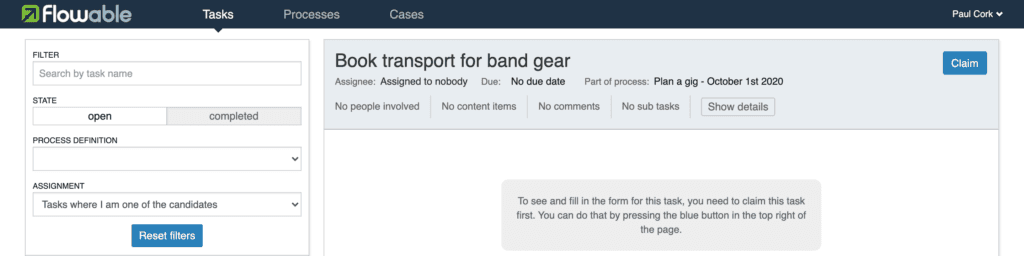
The task list should now show a task to book the transport, but before you can work on it, you need to get it assigned directly to yourself. Otherwise, it’s like its just sitting in a queue of tasks for the band, waiting for someone to take ownership, or work through the other queued tasks.
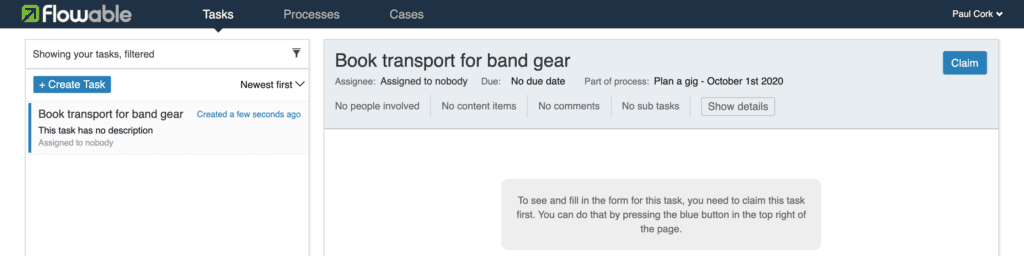
Click the Claim button and you’ll now be able to see the task form and complete the task.
Dude, we’re nearly done.
Looking at completed processes
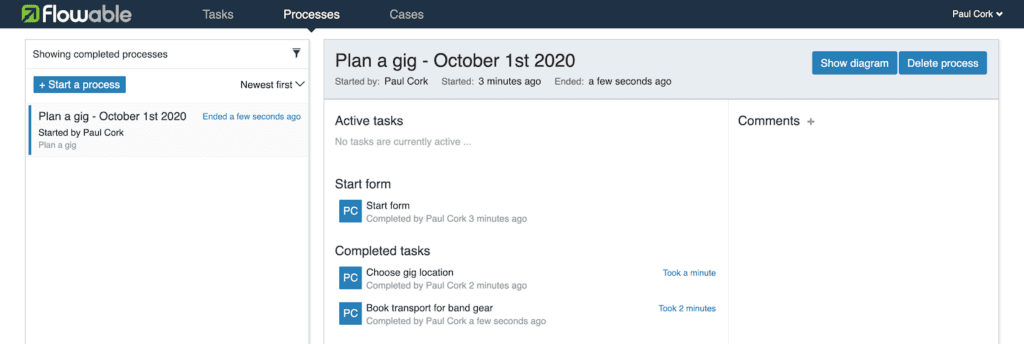
You can look at what was entered in tasks that have been completed by going to the Processes page and changing the list filter to include completed processes. Select the completed instance you’re interested and you’ll see its status view. To look at what data was entered in a form, click one of the completed tasks listed and you’ll be shown the form with the data used.
Wrapping up
There we go, Flow Fans, a run through of just a small part of what you can do with Flowable without writing a line of code. Hopefully, it’s given you enough of an introduction for you to go back and explore some of the options I completely ignored and also try your own processes.
And I think you can be sure you haven’t heard the last from the Flow Pistols!
参考:
相关文章
-
2023-08-10
-
2017-05-09
-
2017-01-17
-
2017-02-16
-
2013-04-06
-
2013-04-08
-
2022-06-14
-
2021-02-02